guide to growing mushrooms at home

Growing mushrooms at home is fun, easy, and enchanting. You get a glance into the unseen world of fungi that usually hides beneath forest leaf litter and downed logs. It’s dazzling to watch mycelium grow and even more enthralling to see luscious mushrooms appear. 


Contrary to what some people believe, growing mushrooms doesn’t require special skills or fancy equipment. It’s as simple as following a recipe! Plus it can mostly be done with materials you already have laying around. Don’t let lab coats, petri-dishes, and “grow rooms” worry you. These are not things you need to consider to simply grow a few mushrooms at home.


This being said, you almost always encounter challenges. Whether it's in the processing of substrates or preparation of your fruiting environment, there is always room to improve yields and reduce losses. To help you along this journey, we have prepared a simple cultivation guide to help improve your success in this endeavor. 

Man holding large Mushroom

The Three Steps In Mushroom Cultivation


Before we get into the nitty-gritty, let's get a holistic overview of what mushroom cultivation looks like. It can be split up into three separate processes as discussed below. 

1. Making a Mushroom Kit

Gourmet and medicinal mushrooms are most often cultivated from Mushroom Kits. It is within Mushroom Kits that farmers grow the fungal mycelium that bears fruit to the mushrooms. They generally consist of a vessel, such as a mushroom grow bag or bucket, a substrate (straw, sawdust, etc.), and living fungal mycelium. Mushroom Kits also go by the name of grow kits, grow bags, and fruiting blocks.


Making the mushroom kit is the most hands-on part of the cultivation process. It involves some sanitary precautions as well as processing your substrate via pasteurization/sterilization. During this process, the substrate is placed into your vessel along with living fungal mycelium.


Lion's Mane Mushroom kit growing

2. Incubation

During this stage, the mushroom kits are left in a cool and dark environment to allow the mycelium to consume the substrate. This usually lasts between 2-4 weeks.

Mushroom incubation room filled with inoculated bags

3. Fruiting

Once the substrate is fully colonized it is ready to fruit. Here the farmer will facilitate this by providing a humid environment, adequate temperatures, and proper gas exchange. After the first fruiting, mushroom kits can be stimulated to produce and 2nd or 3rd flush.

Mushroom fruiting chamber filled with growing mushrooms

Making the Mushroom Kit


Equipment

Mushroom Spawn
Mushroom Spawn is the most specialized thing you will need. It is the mycelium used for “seeding” or propagating your fungus. The success of your growth is entirely dependent on the quality of the spawn, so make sure it is healthy, clean, and made by a professional. Spawn is produced under strict sterile conditions and its production is an advanced process. It is typically produced with grain or sawdust.

When you are purchasing spawn one of the most important decisions you will have to make is the variety of mushrooms you wish to grow. For novice growers, it is often recommended to start with oyster mushrooms. These are the hardest and easiest mushrooms to grow. They can also be cultivated on straw or agricultural waste.

Substrate
The substrate is the organic medium that your mushroom feeds on and inhabits. It must not only provide proper nutrition for your fungi, but it must also provide the adequate living conditions necessary for the growth of mycelium. Some common examples of substrates are straw, sawdust, and agricultural waste. Certain mushrooms can be picky when it comes to the types of substrates they prefer.

Your Vessel
This is the vessel that will contain your substrate as it is colonized and consumed by your fungal mycelium. This can be a ready-made mushroom grow bag, a 20 liter bucket, or countless other containers. They must be closed but be able to provide gas exchange, ideally through a filter-like medium.

How to make a Bucket For Growing Mushrooms

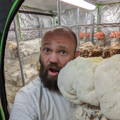
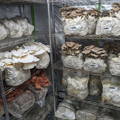
One of the easiest ways to grow mushrooms “from scratch” is using a 20 liter bucket. This technique is popular for home growers since the materials can be reused and the size/stackability is agreeable. Plus you may already have one laying around.


All you need is the bucket and a drill with a 6mm drill bit. A food-grade bucket is recommended to ensure it hasn’t contained any potentially harmful compounds. Make 6 evenly spaced holes along the bottom, middle, and top of the bucket. Voila, your bucket is ready for growing mushrooms!

It is recommended to cover the holes with micropore tape. This can easily be found in a pharmacy and acts as an easy filter. While some growers have success without this, it can help reduce risks of contamination. (Masking tape or even inserting your bucket into another bucket will work also).

Pasteurization Equipment
Pasteurization is a process conducted to kill and eliminate harmful microorganisms living on the substrate. These not only have the potential to compete with your fungus, but they can attack it. 

Lime Pasteurization (our prefered method)

Equipment

1. Large Container


2. Hydrated Lime (builders lime from bunnings works)


3. Water


4. Mesh Bag or you can use a strainer at the end


5. Substrate


6. Disposable Gloves

Procedure (Please wear plastic gloves)

1.  Fill a large container with water. This can be a large pot, barrel, or container. Must be large enough to hold 20 liters of the substrate.


2. Mix in around 2 -4 g per liter of water.

3. Place your substrate in your mesh bag and soak it in the lime bath. Make sure it is fully submerged for 12 hours.


4. Remove from the lime bath and let it drain for a few hours.


Hot Water Pasteurization

Equipment

1. Large pot or barrel for heating water


2. Water


3. Mesh Bag or you can use a strainer at the end


4. Substrate

Procedure

Heat water to 85C in a large pot or barrel. Make sure you have enough space to submerge 5 gallons of the substrate.

Submerge at this temperature for one hour.

Remove it from hot water and let it drain for a few hours until it.


Alternative

You can also place your mesh bag of the substrate within a 20 liter bucket and fill it with boiling water. Keep the bucket well insulated for 3-4 hours then remove and drain.


Sanitary Supplies and Workspace
Microorganisms are on all surfaces and even in the air around us. While most aren't particularly harmful to the mushroom cultivation process, there are a handful of pest microbes that can cause problems. 
For this reason, sanitary precautions are recommended.

  • Alcohol or Disinfectant Spray
  • Paper Towels or Clean Hand Towels
  • Clean table or workspace with a surface that is easy to disinfect.
  • Gloves

The Process


  • Prepare your workspace and equipment. Make sure everything is clean and disinfected. This includes the table, outside of the spawn bag, vessels, hands, and arms. It is best to conduct this indoors in an area with minimal wind, dust, or decomposing materials.

  • Pasteurize your substrate as described above in the pasteurization equipment section. Make sure it is well drained to avoid excessive moisture content. If the substrate is squeezed in the palm of your hand it should only release a couple of drops.

  • Have all your equipment ready in your workspace. Wash your hands, and lower arms, wear gloves and make sure everything is disinfected. Begin placing the first layer of the substrate into your vessel. The first layer should only fill about 15-20% of the vessel. Gently compact it to remove air pockets.

  • Take your spawn and break it up to make sure it is in small individual particles. If your spawn is in a grow bag you can just do this by squeezing it, it is in a jar you can smack it against an inflated bicycle wheel. Disinfect again if necessary. Apply a thin layer of spawn. Estimate to use 4-8% spawn to the substrate.

  • Add another layer of substrate and repeat to form successive layers with spawn in between. The whole time you should be compacting your substrate down to make sure your kit is dense and without air pockets.

  • If you are using mushroom grow bags you now want to seal it. This can simply be done by folding the top tightly and sealing it with tape, use an impact sealer, or simply twist the toptogether and cable tie it.


innoculation


Whether or not you need sterile conditions for inoculation also depends on the level of supplementation in your substrate. As a general rule, if the supplementation exceeds 15%, you'll need to inoculate in a sterile environment. This could be under a laminar flow hood or inside a still air box.


Sterile conditions are crucial in this case to prevent contamination from other organisms that might compete with the mushroom mycelium for nutrients in the highly supplemented substrate.There are generally two ways to inoculate a substrate with mushroom spawn, and depending on the substate (how supplemented it is you may or may not need sterile conditions to innoculate. as a general rule if the supplementation is above 15% you neeed a sterile enviroment to innoculate in ie flow hood or still air box.


There are generally two methods to mix spawn with the substrate in the context of mushroom cultivation.


  1. The simpler and my preferred method involves directly mixing the spawn with the substrate. This straightforward approach ensures the spawn is evenly distributed throughout the substrate, promoting consistent mycelial growth.
  2. The second method requires a bit more work but can also be effective. Start by breaking up your spawn to ensure it's in small, individual particles. If your spawn is in a grow bag, you can do this simply by squeezing the bag. If it's in a jar, you can gently shake it or tap it against an inflated bicycle tire to break up the contents. Remember to disinfect again if necessary to prevent contamination. Next, apply a thin layer of the broken-up spawn to your substrate. 

As a rule of thumb, aim to use around 4-8% spawn by weight in relation to your substrate. This ratio ensures that there's enough spawn to effectively colonize the substrate without wastage.

Incubation

For incubation place your completed mushroom kit in a cool dark place. Around 20°C is good for most mushroom varieties. Find a place with relatively stable temperatures, as most mushrooms don't enjoy temperature fluctuations. It doesn't have to be completely dark but avoid indirect sunlight. Remember your mushroom kit still needs to breathe so avoid placing it in a completely closed environment.


Incubation Time

The time needed for incubation typically varies between 2-4 weeks but can be longer. Temperatures, substrate quality, spawn percentage, and your fungal culture are all variables that affect incubation time. You know your mushroom kit is ready for fruiting once the substrate has been completely transformed into white fungal mycelium. If you start seeing the production of "pins" or young mushrooms then you can also move on to fruiting.


Fruiting and Harvesting

Once your mushroom kit is fully colonized it is time to fruit it. While fruiting will occur on its own naturally, experienced growers facilitate this process to ensure consistent and scheduled yields. This is done by increasing air moisture and gas exchange. Gas exchange is increased by making a cut in the bag or removing micropore tape from holes in the bucket. 


Optimal Fruiting Environment

Mushrooms fruit best when there is high humidity (<90%), indirect sunlight, proper gas exchange, and adequate temperatures.


  • Adequate temperatures will vary depending on the type of mushroom you are cultivating.
  • Indirect sunlight helps mushrooms develop their pigments and increases their Vitamin D content.
  • Proper gas exchange ensures the mushrooms have fresh oxygen. It also prevents the accumulation of CO2 within the environment which stimulates the growth of long stems.
  • Since mushrooms are more than 90% water having high humidity is crucial. If you are unable to provide the ideal environment, spraying them with water a couple of times a day can help. The young primordia are most prone to drying up.


Harvesting

The perfect time for harvesting depends on the variety of mushrooms you are cultivating. It is recommended when harvesting to pluck the entire mushroom directly from the mushroom kit. Knowing the exact time to harvest can take a bit of experience.


  • Oyster Mushrooms - The best time to harvest oyster mushrooms is right before the margin of the cap begins to lift.
  • Lion's Mane - Lion's Mane should be harvested when the teeth are barely 1-2 cm long. At this point, the flavor and texture are at their prime.
  • Chestnut Mushrooms - Harvest these while the cap is still round and spherical. Like this, they have the best texture for consumption.


Getting More Flushes

After you get your first harvest from the grow kit it is possible to get a second or even third flush. To do this simply leave your grow kit for about 1-2 weeks. After this, submerge it in water or place it in a humid environment. If this still doesn’t work you can try giving the grow kit a firm slap.


Common Problems

Challenges In Dry Climates

The biggest challenges to fruiting can occur in arid climates. If you can find a place that is naturally humid such as a basement or cellar then that is an excellent option. Misters, fog machines, grow tents and other equipment can be used to increase humidity.

Contamination

Contamination is caused by other fungi and microorganisms that compete with and attack your mycelium. They can be a variety of colors ranging from green to white to black.

If you are experiencing contamination then there can be several reasons why. It is possible your pasteurization process wasn’t conducted properly or perhaps your substrate is too rich in nutrients. It could also be your spawn, inadequate environmental conditions, or lack of cleanliness.

Little or Slow Growth

This can also be caused by a number of things. If you notice this only occurring on the bottom of the mushroom kit then it may be due to excessive moisture. Inadequate pasteurization or using a substrate that is not suitable for your mushroom can also cause this. Low-quality spawn or inadequate environmental conditions are also common reasons why growth can be slow.